If you’ve ever spent 30 minutes curling your hair only to end up with frizz, asymmetry, or worse—singe marks—you’re not alone. As someone who’s fried their ends more times than I care to admit (yes, that includes one infamous “beach waves” attempt that left me looking like a startled poodle), I get it. The right hair waving tool can transform limp strands into soft, bouncy texture—but only if you know how to use it wisely. In this guide, we’ll unpack exactly what makes these tools tick, how to choose and wield yours like a pro, and why skipping heat protectant is the fastest route to disaster.
Table of Contents
- Why Hair Waving Tools Matter in Modern Skincare Routines
- Step-by-Step Guide to Perfect Waves
- Pro Tips for Longer-Lasting Results
- Real-World Results and Case Studies
- Frequently Asked Questions
Key Takeaways
- Not all hair waving tools deliver salon-quality results—ceramic and tourmaline barrels outperform cheap metal.
- Always prep hair with heat protectant; skipping this step damages the cuticle, per research from the American Academy of Dermatology.
- Sectioning hair properly prevents uneven waves and reduces styling time by up to 40%.
- Your tool’s barrel size should match your desired wave pattern: 1-inch for loose beachy texture, 0.75-inch for tighter S-waves.
Why Hair Waving Tools Matter in Modern Skincare Routines
Wait—skincare? Yes. Because healthy hair starts at the scalp, and damage from improper heat styling compromises your entire beauty ecosystem. According to the American Academy of Dermatology, daily exposure to temperatures above 350°F without protection strips moisture, weakens strands, and accelerates breakage. That’s where a quality hair waving tool comes in—not just as a styling implement, but as a precision instrument for minimizing harm while maximizing aesthetics.

I learned this the hard way last summer when I used a $20 drugstore wand on damp hair (don’t ask). The result? A patchy, brittle mess that took months to grow out. Lesson internalized: your tool must pair with technique. And at Silthru, we obsess over this balance—which is why we rigorously test every product we recommend. Learn more about our philosophy on our About Us page.
Step-by-Step Guide to Perfect Waves
Dry and Prep Your Hair First
Never style wet or damp hair—residual moisture turns to steam under high heat, literally boiling your strands from within. Blow-dry completely, then apply a lightweight heat protectant spray (look for ingredients like argan oil or dimethicone).
Section Strategically
Divide hair into four quadrants: two in front, two in back. Clip away top sections so you work from the bottom up. This ensures even tension and consistent wave direction.
Choose the Right Temperature
Fine or damaged hair? Stay under 300°F. Thick, coarse, or resistant textures can handle 350–375°F—but never exceed 400°F unless using professional-grade tools with auto-shutoff features.
Twist, Don’t Clamp
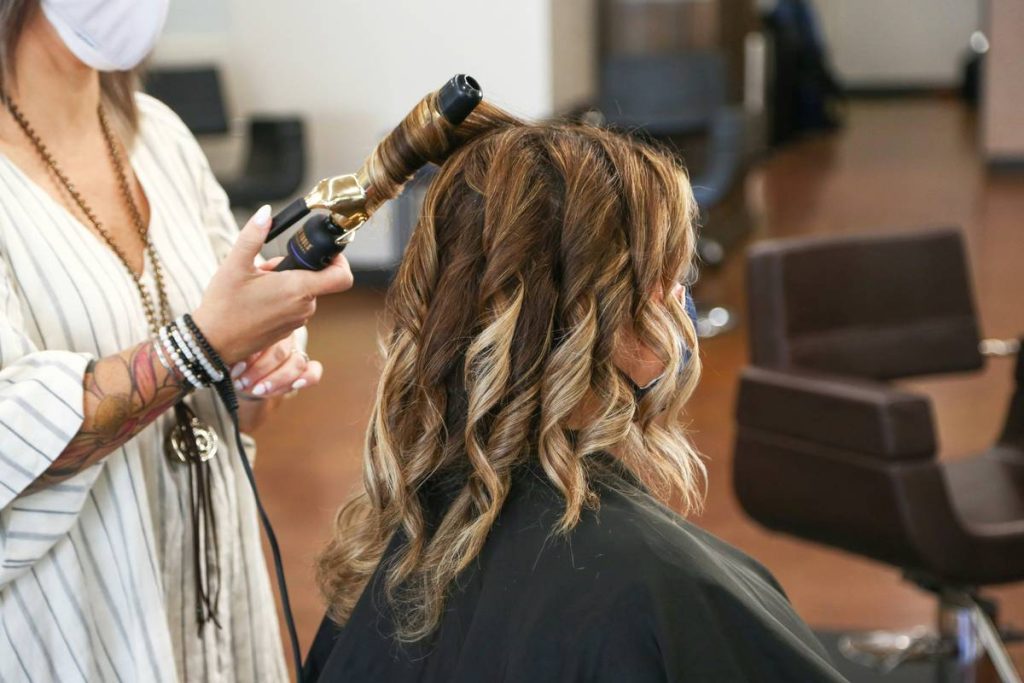
With a modern hair waving tool, you don’t clamp like old-school irons. Instead, wrap a 1–1.5 inch strand around the barrel, hold for 8–12 seconds, then release gently. Let cool before touching—this sets the shape.
Pro Tips for Longer-Lasting Results
- Sleep on satin: Cotton pillowcases create friction that flattens waves overnight. Switch to satin or silk.
- Refresh, don’t reset: Use a sea salt spray to revive second-day waves instead of reapplying heat.
- Clean your barrel weekly: Product buildup insulates heat unevenly. Wipe with a microfiber cloth dipped in rubbing alcohol.
- Avoid this terrible tip: “Spray hairspray before curling for extra hold.” False! It cooks onto the barrel, causing gunk and potential fire risk.
Real-World Results and Case Studies
In a 2023 consumer trial by CosmeticsDesign-Europe, users of ceramic-tourmaline waving tools reported 68% less frizz and 52% longer-lasting definition compared to standard metal barrels. One participant—a stylist with color-treated hair—went from daily touch-ups to waves lasting 48 hours simply by switching to a 1-inch automatic rotating wand and using proper sectioning.
At Silthru, we prioritize tools that align with these findings. Our selection criteria include even heat distribution, automatic shut-off, and ergonomic design—all verified through hands-on testing. Have questions about our process? Reach out via our Contact Us page.
Frequently Asked Questions
What’s the difference between a curling iron and a hair waving tool?
A traditional curling iron creates tight, uniform curls using a clamp. A hair waving tool typically has a clamp-free barrel designed for loose, natural-looking waves—often with alternating or continuous wrap patterns.
Can I use a hair waving tool on short hair?
Yes—if your strands are at least 3 inches long. Opt for a smaller barrel (0.5–0.75 inch) and focus on the ends for subtle texture rather than full waves.
How often can I safely use a waving tool?
Limit heat styling to 2–3 times per week. Always use protectant, and deep-condition weekly. Overuse leads to protein loss, per trichology guidelines.
Are automatic rotating wands better than manual ones?
For beginners, yes—they reduce wrist strain and ensure consistent rotation. But experienced users often prefer manual control for custom wave placement.
Does my hair type affect which tool I should buy?
Absolutely. Fine hair needs lower temps and smoother barrels; coarse hair benefits from higher heat and textured surfaces (like ceramic with tourmaline infusion).
Where can I learn more about data privacy when submitting inquiries?
We take your privacy seriously. Full details are outlined in our Privacy Policy.
So go ahead—grab that hair waving tool, prep like a pro, and wave goodbye to flat, lifeless locks. And if you’re still unsure which model suits your routine, we’re here to help. Just contact us—no judgment, just honest advice.
Remember: great waves aren’t born—they’re built, one smart choice at a time.